A cluttered gaming desk isn’t just an eyesore, it’s a performance liability. Tangled cables create friction during intense matches, block critical airflow to your GPU, and turn every peripheral swap into an archaeological dig. The difference between a clean setup and a cable nightmare often separates casual players from those who take their gaming seriously.
Professional esports players and content creators understand this. Walk into any tournament setup or streaming studio, and you’ll find zero visible cable mess. That’s not just for the cameras. Proper gaming desk cable management directly impacts equipment reliability, response consistency, and your ability to troubleshoot when something inevitably goes wrong at 2 AM before a ranked session.
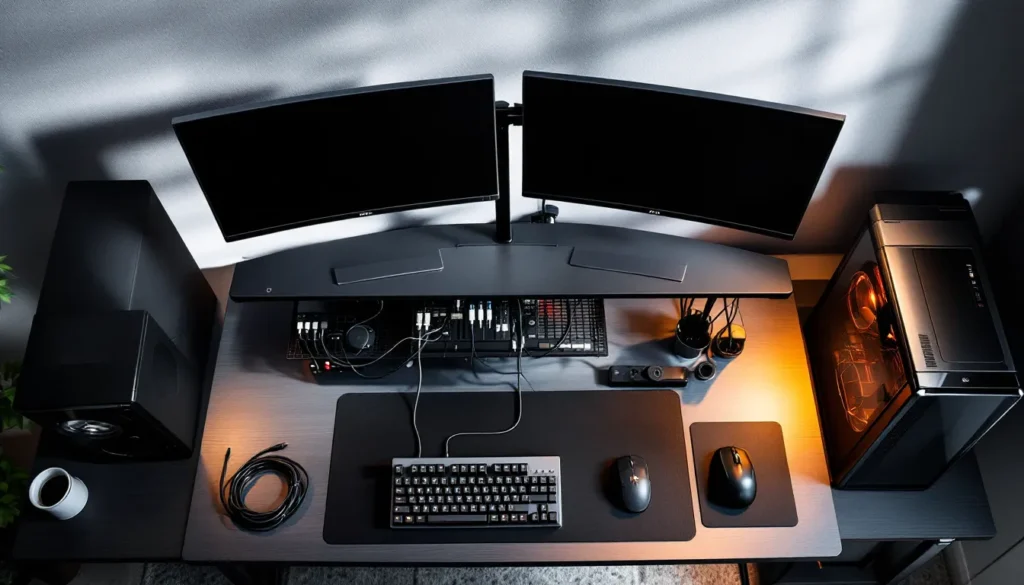
This guide breaks down everything from basic routing principles to advanced multi-monitor solutions. Whether you’re running a single-screen battle station or a triple-monitor command center with RGB everything, these techniques will transform your desk from chaotic to competition-ready.
Key Takeaways
- Proper gaming desk cable management eliminates mouse snags during gameplay, improves equipment cooling, and reduces troubleshooting time when issues arise.
- Organize cables by function (power, display, peripherals, audio) and use velcro straps, cable trays, and clips to create clean, maintainable routes that support your gaming setup.
- Inventory your specific cables and measure routing distances before purchasing management tools to avoid over-buying or ending up with undersized solutions.
- Wireless peripherals can reduce cable clutter for casual gaming, but competitive players should prioritize wired mice, keyboards, and headsets for zero-latency performance.
- Leave intentional service loops (8–12 inches of managed slack) at each connection point and avoid over-tightening cables to prevent connector damage and signal degradation.
- Plan gaming desk cable management for future upgrades by using flexible systems and documenting your setup with reference photos for quick reconfiguration.
Why Cable Management Matters for Gamers
Performance Benefits Beyond Aesthetics
Cable management affects more than your desk’s Instagram potential. A properly routed USB cable to your gaming mouse ensures consistent polling rates without physical interference. When cables are taut or pinched under desk legs, signal degradation can occur, particularly with older USB 2.0 connections that still power many peripherals.
Tangled cables also introduce physical resistance during gameplay. Imagine tracking an enemy in a competitive FPS, only to have your mouse cable snag on your keyboard wire mid-flick. That split-second friction has cost more rounds than anyone wants to admit. Routing cables through proper channels eliminates this variable entirely.
Maintenance becomes exponentially easier with organized cables. Need to swap out a failing HDMI cable? With proper management, it’s a 30-second job instead of tracing cables through a Gordian knot behind your monitors. When you’re troubleshooting a display issue before a tournament match, speed matters.
Impact on Airflow and Equipment Longevity
Modern gaming PCs pump serious heat, especially high-end GPUs pulling 300+ watts under load. Cable rats’ nests behind or under your desk create dead zones where hot air accumulates. This forces your case fans to work harder, increasing noise and potentially reducing component lifespan.
Power cables deserve special attention here. Bundling multiple high-wattage cables, like your PC power supply, monitor feeds, and external amplifiers, creates heat concentration points. Quality cable management separates power delivery from data cables, reducing electromagnetic interference and heat buildup.
Dust accumulation accelerates around cable clumps. Those tangled areas trap particles that would normally fall or get cleared by airflow. Over months, this builds insulation around cables and components, degrading thermal performance. Regular cleaning becomes nearly impossible when cables form impenetrable barriers behind your setup.
Assessing Your Gaming Desk Cable Situation
Inventory Your Cables and Peripherals
Before buying a single cable tie, document what you’re actually working with. Most gaming setups include:
- Display cables: HDMI 2.1, DisplayPort 1.4, or USB-C for monitors
- Power cables: PC PSU, monitor(s), speakers, USB hubs, RGB controllers
- Peripheral cables: Mouse, keyboard, headset (if wired), microphone, webcam
- Audio cables: 3.5mm aux, XLR for professional mics, RCA for legacy speakers
- Data cables: Ethernet, external storage, charging cables for controllers
Count the exact number of cables. A typical dual-monitor gaming setup runs 12-18 cables. Triple monitors with dedicated audio gear can hit 25+. This number determines how much management hardware you’ll need.
Check cable lengths too. Many stock cables are unnecessarily long, creating excess slack that’s difficult to manage. A 10-foot HDMI cable makes sense for wall-mounted TVs, but your desktop monitor 18 inches away only needs 3 feet. Replacing overlength cables with appropriately sized ones eliminates half your management problems before you start.
Identifying Cable Routing Opportunities
Most gaming desks offer natural routing pathways. Look for:
- Grommets: Pre-cut holes for dropping cables from desktop to underside
- Frame channels: Metal or wooden desk frames often have gaps perfect for cable runs
- Back edges: Space between your desk and wall where cables can run vertically
- Monitor stand bases: Hollow areas in stand poles for concealing display cables
Trace the path from each device to its destination. Your mouse cable needs the shortest, most friction-free route possible, usually a gentle arc from mouse pad to PC. Monitor cables can take longer routes since they’re stationary. Power cables should run separately from data cables when possible to minimize interference.
Measure the distances. A cable route from your PC under the desk, along the frame, up through a grommet, and to your left monitor might be 5 feet total. Having exact measurements prevents buying management tools that are too short or wastefully long.
Essential Cable Management Tools and Accessories
Cable Trays and Raceways
Cable trays mount underneath your desk, creating a suspended platform where power strips and cable bundles live. The J-channel style is most popular, it’s a simple metal basket that screws into your desk’s underside. These handle heavy loads and make adding or removing cables straightforward.
Wireframe trays work best for larger setups. A 24-inch tray can hold multiple power strips, your USB hub, and all the excess cable slack. Position them toward the back of your desk for easy access when seated but hidden from normal viewing angles.
Raceways are surface-mounted channels for running cables along walls or desk edges. The adhesive-backed versions work on most surfaces, though screw-mount options provide better long-term security. A 2-inch raceway along your desk’s back edge can conceal the entire run from your PC to monitors.
For desks against walls, vertical raceways handle the drop from desktop height to floor-level power outlets. This beats having cables dangle visibly and prevents tripping hazards. Many professional streamers use this approach to achieve the “floating peripheral” look where no cables are visible from camera angles.
Velcro Straps, Zip Ties, and Cable Sleeves
Velcro straps are the gold standard for cables you’ll adjust frequently. They’re reusable, don’t damage cable insulation, and come in various lengths. Use 6-inch straps for bundling 3-5 cables together and 12-inch versions for securing bundles to desk frames.
Buy velcro straps in bulk, a 100-pack costs $10-15 and you’ll use them constantly. The two-sided versions (hook and loop on opposite sides) are more versatile than ties with a separate loop attachment.
Zip ties work for permanent installations where cables won’t move. They’re perfect for securing cable bundles to the underside of cable trays or anchoring runs along desk frames. Use the releasable type rather than permanent-cut versions, you’ll thank yourself during your first upgrade.
Never overtighten zip ties on cables. Excessive compression damages internal wiring, particularly on thinner cables like USB or 3.5mm audio. If the cable jacket deforms visibly, you’ve gone too far.
Cable sleeves bundle multiple cables into a single, clean tube. Neoprene sleeves are most durable and provide minor protection against abrasion. Measure your thickest cable bundle before buying, sleeves come in diameters from 0.5 to 2 inches. A 1-inch sleeve typically handles 4-6 standard cables comfortably.
For RGB setups, consider clear or mesh sleeves that allow LED lighting to shine through. Some gamers run RGB strips inside cable sleeves for a unique underglow effect.
Adhesive Cable Clips and Anchors
Cable clips are small plastic guides with 3M adhesive backs. They attach to any flat surface and hold individual cables in place. Use them to route your mouse cable along your desk edge, preventing it from dragging across your mouse pad’s surface.
The single-cable clips work best for high-priority peripherals. Your keyboard and mouse cables each get their own dedicated pathway. Multi-cable clips (holding 3-5 cables) organize secondary connections like USB charging cables or audio runs.
Adhesive strength varies wildly between brands. The cheap Amazon multipacks often fail within weeks, especially on textured surfaces. 3M-branded clips cost more but stay mounted indefinitely. Clean surfaces with isopropyl alcohol before application to maximize adhesion.
Anchor points are heavier-duty versions for securing cable bundles. A screw-mount anchor on your desk’s underside provides a tie-off point for slack management. Rather than having 3 feet of excess HDMI cable coiled loosely, wrap it and secure to an anchor point for a clean look.
Cable drops, vertical anchor points mounted to desk edges, guide cables from desktop to underside. These create clean vertical runs instead of cables spilling over edges randomly.
Power Strip Mounts and Surge Protectors
A quality surge protector is non-negotiable for gaming setups. Power fluctuations can fry components worth thousands of dollars. Look for units with:
- Joule rating: Minimum 2000J for adequate protection
- Clamping voltage: 400V or lower
- Response time: Under 1 nanosecond
- Equipment warranty: Many brands cover connected equipment up to $100k
The form factor matters for cable management. Flat, wall-mount surge protectors eliminate desktop clutter entirely. Mount one to your desk’s underside or on the wall behind your setup.
Tower-style power strips (vertical orientation) save space and often include USB charging ports. Position these in cable trays or anchor them to desk legs for easy access.
Many competitive players run separate power strips for critical gear versus accessories. PC, monitors, and modem get the premium surge protector, while RGB lights and speakers use a secondary strip. This ensures clean power delivery to performance-critical components and simplifies troubleshooting.
Step-by-Step Gaming Desk Cable Management Process
Disconnect and Clean Your Setup
Power down everything and photograph your current cable connections. These reference photos are crucial for reconnection, you’ll forget which USB port your RGB controller used, guaranteed.
Disconnect all cables methodically, grouping them by type. DisplayPort cables in one pile, power cables in another, USB peripherals in a third. This seems tedious but prevents the “which cable goes where” panic during reassembly.
Clean your entire desk surface and the area behind/beneath it. Years of accumulated dust hide in cable clusters. A microfiber cloth with screen-safe cleaner handles monitors and peripherals. Compressed air blasts dust from crevices and connector ports.
Inspect every cable for damage. Frayed insulation, bent connector pins, or kinks in the cable body indicate replacement time. Gaming setups stress cables through constant movement, mice and headsets particularly. Budget for replacing 2-3 cables during any major reorganization.
Group and Label Cables by Function
Organize cables into functional groups:
- Critical path: Mouse, keyboard, main monitor, PC power
- Secondary displays: Additional monitor cables and power
- Audio chain: Headset, microphone, speakers, DAC/amp
- Power delivery: All power cables and transformers
- Accessories: RGB controllers, USB hubs, charging cables, camera
Many pro esports players take this a step further by implementing organizational systems borrowed from professional streaming setups. Label each cable at both ends using cheap label makers or colored tape. A small label reading “Mon-L” on both ends of your left monitor’s power cable eliminates guesswork forever.
Color coding works too. Red tape for power, blue for video, yellow for USB. Some cable manufacturers sell pre-colored cables in matching sets specifically for this purpose.
Measure the required length for each cable’s optimal path before final routing. That 10-foot HDMI cable might need replacing with a 3-foot version, or you’ll deal with excess slack management forever.
Route Cables Along Strategic Pathways
Start with power infrastructure. Your surge protector mounts under the desk or against the wall, positioned where most cables naturally converge. Run all power cables to this central point first, it forms the foundation everything else builds on.
Display cables come next. Route these from GPU to monitors through the least visible path, typically along desk edges or through grommets. Keep display cables separate from power runs when possible. HDMI and DisplayPort are well-shielded against interference, but segregation remains best practice.
Peripheral cables get individual attention based on priority:
- Mouse cable: Absolute shortest path with minimal friction. Consider a mouse bungee if using wired, it elevates the cable and eliminates drag entirely.
- Keyboard cable: Route to the side rather than straight back. Creates cleaner lines and prevents cable visibility during use.
- Headset: If wired, route the cable over your shoulder pathway rather than across the desk. Many headset stands include integrated cable management for this.
Group cables into bundles only where they follow the same path. Don’t force cables into bundles just to reduce visual count, this creates maintenance headaches and restricts airflow.
Secure Cables with Appropriate Management Tools
Work from the power source outward. Secure the surge protector to your cable tray or desk frame using zip ties or the manufacturer’s mounting brackets. This anchor point must be solid, everything else depends on it.
Attach cable clips along your planned routes first, before threading cables through them. Spacing them every 8-12 inches prevents sagging while allowing enough flexibility for minor adjustments.
Bundle cables using velcro straps at regular intervals. Desktop-to-floor runs need securing every 10-12 inches to prevent drooping. Horizontal runs under the desk can space straps wider, every 16-18 inches works.
Leave service loops, intentional slack coils, at connection points. Your PC might move 6 inches for cleaning. Your monitor might rotate for portrait mode. Build in 8-12 inches of managed slack at each device to accommodate movement without stressing connections.
The mouse cable is an exception to bundling. It should run completely independent from other cables to eliminate any snagging potential. A single cable clip near your mouse pad’s edge and another near the PC connection point is usually sufficient.
Advanced Cable Management Techniques for Multi-Monitor Setups
Managing Display, Power, and Peripheral Cables
Triple-monitor setups introduce exponential cable complexity. Each monitor needs power plus video input, that’s six cables minimum before adding USB hubs or audio passthroughs that many monitors include.
The key is treating each monitor as an independent zone during initial routing, then consolidating where paths converge. Run each monitor’s cables down its individual stand, bundle them at desktop level, then route the combined bundle through a single grommet.
Bezel-matched monitors simplify this dramatically. When monitors sit edge-to-edge with minimal gap, you can route the center monitor’s cables behind the left or right unit, hiding everything until the final drop to PC level.
USB-C monitors with daisy-chaining capability are game-changers for cable reduction. A single USB-C cable from GPU to monitor 1 carries video, then a USB-C cable from monitor 1 to 2, then 2 to 3. Each monitor still needs power, but you’ve eliminated three separate display cables from GPU. This assumes your GPU supports DisplayPort Alt Mode over USB-C, most RTX 3000-series and newer do.
For monitors without daisy-chaining, run all display cables together in a single sleeve from GPU to desk edge, then split them to individual monitors. This creates one thick cable bundle instead of three separate runs.
Using Monitor Arms for Integrated Cable Routing
Monitor arms provide the cleanest possible cable management for multi-monitor setups. Quality arms include cable channels built into the support structure, cables run inside the arm itself from base to VESA mount.
The VESA mount point (where monitor attaches to arm) hides all cable connections behind the monitor. Power and display cables drop from the monitor’s connection ports directly into the arm’s channel, completely invisible from any normal viewing angle.
When buying monitor arms for cable management purposes, prioritize:
- Internal cable routing: Channels should accommodate at least 5 cables (power, DisplayPort, USB, audio in/out)
- Cable exit points: Look for bottom-exit designs where cables emerge underneath the desk
- Quick-release cable clips: Tool-free cable access for upgrades
Triple-monitor arms typically use a central pole with three articulating arms. Route cables down each individual arm, consolidate them at the central pole, then run a single bundle down to desk level. Professional setups achieve complete cable invisibility this way.
Some competitive players prefer monitor arms specifically for cable management even on single-monitor setups. The ability to fully hide power and display cables justifies the $100-300 investment for clean aesthetics and easier desk cleaning.
Wireless Solutions to Minimize Cable Clutter
Wireless Keyboards, Mice, and Headsets
Wireless peripherals eliminate 3-5 cables instantly, making them tempting for cable management. Modern wireless tech has largely eliminated the latency issues that plagued earlier generations.
Wireless mice have reached parity with wired for competitive gaming. Logitech’s Lightspeed, Razer’s HyperSpeed, and SteelSeries Quantum 2.0 all deliver sub-1ms latency, indistinguishable from wired in actual gameplay. Battery life on premium wireless mice now exceeds 70 hours per charge.
The tradeoff is weight. Wireless mice carry battery mass that wired versions don’t. For ultra-lightweight preference (sub-60g), wired still dominates. But 70-80g wireless mice with proper cable management alternative are competitive.
Wireless keyboards work perfectly for gaming with modern 2.4GHz dongles. Bluetooth introduces too much latency (10-30ms) for competitive play, but proprietary wireless protocols from Corsair, Logitech, and Keychron perform identically to wired.
Battery life varies dramatically. Hot-swappable battery designs let you charge one battery while using another, zero downtime. Integrated battery keyboards require USB-C charging, which reintroduces a cable periodically.
Wireless headsets are the most controversial wireless peripheral for competitive gaming. Even premium models introduce 5-15ms latency versus wired. For casual gaming, this is imperceptible. For competitive FPS where audio cues determine survival, many players refuse wireless entirely.
Sound quality also suffers compression in wireless transmission. Audiophiles and competitive players who rely on precise directional audio typically stick with wired headsets or dedicated DAC/amp setups. The tradeoff is 6+ feet of cable to manage.
When to Go Wireless vs. Wired for Gaming
Competitive players prioritize performance over aesthetics. Check what settings pro players actually use across different games, you’ll notice most still run wired mice and keyboards even though sponsorships from wireless peripheral manufacturers.
For casual and mid-tier competitive gaming, wireless makes excellent sense:
- Wireless recommended: Single-monitor setups, frequent desk rearrangement, shared gaming/work spaces
- Wired recommended: Multi-monitor battle stations, permanent setups, tournament preparation, audiophile audio chains
The hybrid approach works well, wireless mouse and keyboard for cable reduction, wired headset for audio quality. This eliminates the two most troublesome cables (keyboard and mouse across your desk surface) while maintaining zero-latency audio.
Wireless introduces ongoing costs. Batteries need replacement every 1-3 years depending on peripheral. Wireless dongles can be lost or damaged, and replacements aren’t always available. Factor these maintenance realities into your decision.
Some games benefit more from wireless than others. Strategy games, MMOs, and single-player titles don’t stress latency limits, wireless works perfectly. Competitive FPS, fighting games, and rhythm games where frame-perfect inputs matter favor wired connections.
Common Cable Management Mistakes to Avoid
Over-Tightening Cables and Damaging Connectors
The most frequent mistake is treating cables like rope. Zip ties cranked down hard enough to deform cable jackets damage internal conductors. This isn’t immediately obvious, the cable works fine initially, but develops intermittent faults weeks later.
USB cables particularly suffer from over-compression. The thin gauge wiring inside can’t tolerate the same tension as power cables. When bundling USB cables with velcro straps, you should be able to slide the cable sideways slightly within the bundle. If it’s immobile, you’ve over-tightened.
Connector stress from poor cable management kills peripherals. HDMI and DisplayPort connectors aren’t designed for lateral stress. If your cable management pulls these connectors sideways or at angles, you’re damaging both the cable and the device port. Always route cables to approach connectors in their natural insertion angle.
Mouse cables deserve special mention. Some players secure mouse cables so tightly to minimize movement that they create tension on the mouse connector itself. This gradually loosens the connection, introducing tracking jitter. Your mouse cable should have enough slack for full mouse pad range of motion plus 6-8 inches excess.
Bending radius matters. Every cable type has a minimum bending radius specified by the manufacturer, usually 5-10x the cable diameter. Sharp 90-degree bends in thick cables (like power cables or bundled sleeves) stress the conductors and insulation. Use gentle curves instead of tight corners.
Blocking Ventilation and Airflow
Cable bundles create airflow barriers when positioned incorrectly. Running thick cable sleeves directly behind your PC’s rear exhaust fan forces hot air to redirect around the bundle, reducing cooling efficiency.
Map your PC’s airflow before finalizing cable routes. Modern cases typically draw cool air from the front and bottom, exhaust hot air out the top and rear. Keep cable bundles away from these primary airflow paths.
Monitor ventilation gets overlooked. Many monitors vent heat through slots along the top or rear edge. A thick power cable draped across these vents causes heat buildup that degrades panel lifespan. Route monitor cables down the sides of the stand, not across the rear panel.
Power supplies generate significant heat. Cable trays positioned directly beneath or behind PSUs can cook cables over time, degrading insulation. Maintain at least 2-3 inches clearance between PSU exhaust and any cable concentration.
Desk-mounted PCs (on desktop surface rather than floor) need special attention. The temptation is routing all cables directly behind the PC, creating a dense cable wall that traps heat. Route cables to the sides instead, leaving the rear PC area clear for airflow.
Maintaining Your Cable Management System
Regular Cleaning and Dust Prevention
Cable management isn’t fire-and-forget. Dust accumulates on any horizontal surface, and cables provide plenty of those. Quarterly cleaning prevents buildup that degrades both appearance and thermal performance.
Compressed air remains the best tool for cable cluster cleaning. Work in short bursts to avoid moisture condensation from propellant. Start at the highest point and work downward, letting dislodged dust fall rather than settle on already-cleaned areas.
Cable trays trap dust in their mesh or channels. Remove power strips and major bundles once every 6 months for deep cleaning. A vacuum with a brush attachment handles the heavy dust, compressed air finishes the detail work.
Some enthusiasts run dust filters at major cable entry points. A simple mesh screen over desk grommets catches surprising amounts of debris. These $5 accessories cut dust infiltration by 60-70% with zero maintenance beyond quarterly cleaning.
Velcro straps accumulate dust and lose grip over time. Replace them annually, they’re cheap enough that fresh straps cost less than the frustration of bundles coming loose. When straps start leaving sticky residue instead of releasing cleanly, replacement time has arrived.
Adapting to New Peripherals and Upgrades
Rigid cable management systems fail when you upgrade. Build flexibility into your setup from the start by using velcro instead of zip ties and leaving 10-15% extra capacity in cable trays.
When adding a new monitor, you’ll need space for power and display cables. If your cable tray is maxed out, you’re tearing everything down for reorganization. Starting with a tray rated for 1.5x your current cable count provides upgrade headroom.
Consider future peripheral additions during initial setup. Planning to add a webcam eventually? Route a spare USB cable from your hub to desktop level now, secured but unused. When you add the camera, the infrastructure already exists.
Graphics card upgrades sometimes change connector availability. A new GPU might offer three DisplayPort and one HDMI versus your current two DP and two HDMI. If your cable management assumes specific connector locations, you’ll rebuild when upgrading. Using flexible routing with service loops accommodates connector position changes.
Many PC gaming hardware reviewers emphasize cable management flexibility when evaluating cases and desks. The best systems allow component swaps without disrupting the entire cable infrastructure.
Document your cable management system with photos from multiple angles. When upgrade time comes, these references show exactly how everything was routed. You’ll replicate successful routing patterns instead of reinventing them.
Conclusion
Proper gaming desk cable management transforms your setup from chaotic to professional while delivering tangible performance benefits. Clean cable routing eliminates mouse snags during critical plays, improves airflow to extend component life, and makes troubleshooting straightforward instead of frustrating.
The investment is minimal, $30-50 in velcro straps, cable trays, and clips handles most single-monitor setups. Multi-monitor configurations might reach $100-150 for monitor arms with integrated routing. Compare that to the value of your hardware and the hundreds of hours you’ll spend at your desk, and the math is obvious.
Start with the fundamentals: inventory your cables, plan routing pathways, and carry out solutions progressively rather than attempting everything at once. The disconnect-and-rebuild approach works, but so does gradually improving your system over several sessions.
Cable management isn’t a one-time project. As you upgrade peripherals, swap components, or rearrange your space, maintenance keeps the system functional. Build flexibility into your setup and you’ll thank yourself during every future upgrade cycle.